Mounting with Filtered Mailbox Mount
If you wish to access only certain mailboxes within a database, then you may perform a filtered mount instead of a regular mount.
-
Once you have added all desired sources to the Offline Tree, select the source whose mailboxes you will want to access.
-
Depending on what has been enabled in DigiScope's Database Options, you will presented with either of two menu configurations:
-
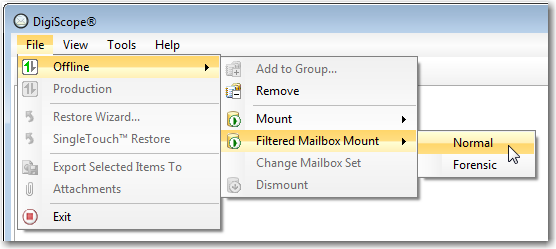
If is checked, click File, Offline, Filtered Mailbox Mount, and then either Normal or Forensic.
-
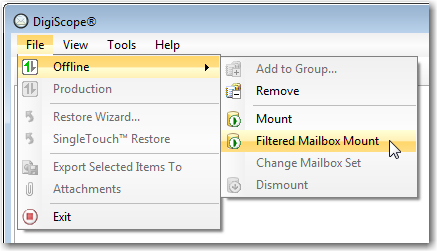
If is not checked, just click File, Offline, and Filtered Mailbox Mount.
NOTE: These same mount options are presented in the context menus when you right-click on any database, group, or the "Offline" node.
The Filtered Mailbox Mount dialog will be displayed.
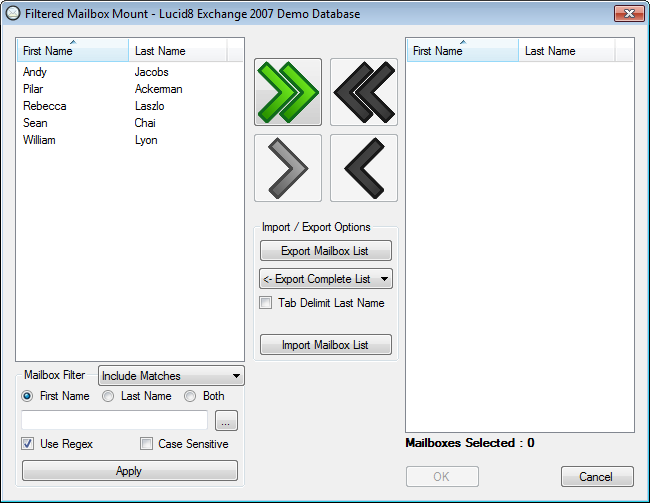
NOTE: After the source is mounted, you can return to this dialog and change the mailboxes that are part of the filter by selecting Change Mailbox Set.
-
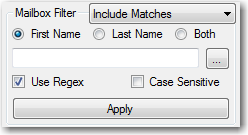
(Optional) Use the Mailbox Filter section to restrict the list of available mailboxes to particular mailboxes whose names match some particular pattern.
-
Set a filter direction in the drop-down:
-
You can choose to filter mailboxes based on the First Name, Last Name, or Both by selecting the appropriate option.
-
You can choose to filter mailboxes using a regular expression by checking the Use Regex option. You may then click the ellipse button to open the Regular Expression Builder.
-
You can choose to have your filter expression be case-sensitive by checking the Case Sensitive option.
-
Click the Apply button to apply the filter to the available mailboxes list.
-
Use the central arrow buttons to include or exclude mailboxes on the right-hand selected mailboxes list.

-
Use the green double-right-arrow button to add all of the mailboxes on the left-hand available list to the right-hand selected list.
-
Use the green single-right-arrow button to add the currently highlighted mailbox(es) on the left-hand available list to the right-hand selected list.
-
Use the red double-left-arrow button to remove all of the mailboxes from the right-hand list.
-
Use the red single-left-arrow button to remove the currently highlighted mailbox(es) from the right-hand list.
-
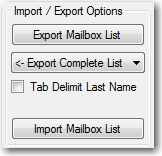
(Optional) If you wish to save any of these selections for future runs of the Filtered Mailbox Mount dialog, you may do so in the Import / Export Options section.
-
Use the middle drop-down to select which list you wish to export:
-
<- Export Complete List will export the complete list of available mailboxes, ignoring any filtering or selections.
-
<- Export Displayed List will export the currently displayed mailboxes in the left-hand available mailboxes list.
-
Export Selected List -> will export the right-hand list of selected mailboxes.
-
The Tab Delimit Last Name option will cause first and last names to be separated by a Tab character in the exported list. (The default is to separate them with a space.)
-
Click the Export Mailbox List button to create an exported mailbox list file based on your selected options.
-
If you have previously made an exported list, you may click the Import Mailbox List button to select that previously made file. Doing so will cause this dialog to select all of the mailboxes in the exported list.
-
When you are satisfied with the mailbox selections in the right-hand list, click OK.
The following dialog will be shown, allowing you to follow the progress while DigiScope mounts the mailboxes.
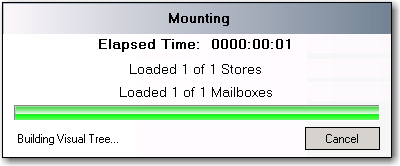
Once the mount process finishes, you will be able to Search, Recover, or Export your data from the offline source.
Continue to Dismounting an Offline Source
Continue to Forensic Mount